Translate

Sunday, September 29, 2013

Speed up that slow team site, make it publish and harness the output cache

The steps below turn your team site into a team site that is capable of using publishing features and capabilities.  But all they really do, from an end user perspective, is optimize how the page loads.

These steps are needed to speed up load times for sites built off the Publishing Portal web template\BlankInternet#0 and/or the Team Site Template\STS#0 to get the desired snappiness affect. 

In other words, these steps will have a positive impact on both publishing portals and/or team sites; since, neither site has the output cache enabled by default.

Pre-requisites:  Site collection Administrator

1.       Open the site and go to top level site settings, _layouts/settings.aspx

2.       Then make sure you’re in the top site, aka the site collection’s first site or parent site and click on Site Collection Features under Site collection administration.  If you see “go to top level site settingsclick it and then click on Site collection features.

3.      Make sure you didn’t click on Site features, check that the url is not ending in _layouts/ManageFeatures.aspx but rather  _layouts/ManageFeatures.aspx?Scope=Site

4.       Now Turn on (activate) SharePoint Server Publishing Infrastructure

5.       Now remove the ?Scope=Site and turn on SharePoint Server Publishing

6.       Now go back to the settings  (_layouts/settings.aspx) page of the top level site

7.    Click on Site collection cache profiles and examine the various profiles, especially the Intranet (Collaboration site)

8.       Go back to settings, and click on Site collection object cache and examine the settings

9.       Go back to settings, click on site collection output cache, enable the output cache by checking the box, choose the Intranet (Collaboration site) for anonymous cache profile and for authenticated cache profile, check the boxes under Page output cache policy and if you want debug info, check that one as well

10.   Go back to settings, and under Site Administration, click site output cache, click apply these settings to all sub sites, and then click ok

11.   Close your sites, clear your browser cache, flush your history of visitied sites from your machines DNS cache (ipconfig /flushdns)

12.   Ok, now the site will be tested as to how fast it opens, open it

Sunday, September 22, 2013

Enable and Use Developer Dashboard to see how your page loads and view metrics.

Pre-requisites:

Site-collection administrator

Follow these steps, or ask your admin, to enable the developer dashboard in on demand mode:

(green-can use your own values, red-controls outcome, black-don't change it)


1.  Open the SharePoint Management Shell as an admin
 
2. Type the following commands:
 
$service=[Microsoft.SharePoint.Administration.SPWebService]::ContentService

$devdashsetting=$service.DeveloperDashboardSettings

$devdashsetting.DisplayLevel=[Microsoft.SharePoint.Administration.SPDeveloperDashboardLevel]::OnDemand

$devdashsetting.Update()

This script enables the Developer Dashboard in OnDemand mode.

You could also, as an alternative way of enabling this, add those commands to a text file, save the file as a .ps1 and then execute the ps1 on your farm. 
 
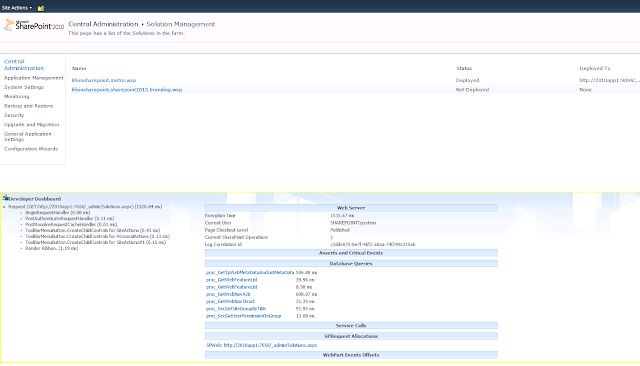
Then once the dashboard is enabled for on-demand use, developers that are members of the site collection admins can enable the dashboard by clicking the icon located next to their user name.


After the dashboard is enabled, the metrics are shown at the bottom of the page that is loaded, refresh the page to see how fast it loads, HTTP Handler events for the HTTP request, Web Server Stats, Asserts and Critical Events, Database Queries, Service Calls, SPRequest Allocations, and WebPart Events Offsets.


To turn it off

$service=[Microsoft.SharePoint.Administration.SPWebService]::ContentService

$devdashsetting=$service.DeveloperDashboardSettings

$devdashsetting.DisplayLevel=[Microsoft.SharePoint.Administration.SPDeveloperDashboardLevel]::Off

$devdashsetting.Update()

Saturday, September 14, 2013

Solution wont deploy, error in web.config, and avoiding this

If you ever run into an issue where you or one of your fellow admins went to deploy a solution using PowerShell and did not use the correct parameters, or it was attempted to deploy a solution that was already deployed with force, the web.config may corrupt and your team may receive an error.

Here is an example of an admin, fishing around for the correct parameters, and then forcing things just because PowerShell hinted so:

click on any of the pictures to see them bigger

High School Shop Teacher Advice:  My High school shop teacher's advice holds true in this case as well.  Mr. Spring said, " It's always best to avoid having to force things" and he was right! 

So, in the example above, the admin should have determined where the solution was deployed before redeploying, by visiting Farm Solutions under system settings and looking at the solution, or by using the dot method with the deployedwebapplications property of the get-spsolution cmdlet. 

Please Note: The driver behind the web.config corruption in this example was the admin service not having been started, not the -force; although, that is not to say that -force is without error causing or issues and there are times when it is absolutely necessary.  The point I'm trying to make here is don't make it your first option.


After that the Admin should have determined that the status of the Microsoft SharePoint 2010 Foundation Administration service on the server running central admin was started, before re-deploying or taking any action on the solution.

Please Note:  Sometimes it is necessary to totally remove and redeploy a solution when this happens.  When you're about to retract a solution, It's always best to have gone into the site collection features and site features, and deactivate any features, starting with site features (_layouts/ManageFeatures.aspx) and progressing to site collection features (_layouts/ManageFeatures?Scope=Site), then retract solution from the farm after deactivation of features at the Site and Site Collection level. 

This is so important, because if the farm solution is retracted without those precautions, often times this creates orphaned features that hinder re-deployment.


GUI isn't safe either

Corruption of the web.config can also occur when attempting to deploy the solution via the gui when the Microsoft SharePoint Foundation Administrative Service is not started 

This is the message that is indicative of the type of web.config corruption that can occur when a solution deployment is attempted from a farm server in a farm that does not have Microsoft SharePoint Foundation Administrative Service properly configured to run under a domain account:


This is the error that'll result\be displayed when deployment is attempted via the GUI and Microsoft SharePoint Foundation Administrative Service is not started on the server running central admin.  At this point, you're best bet is to determine how deep the corruption has went, hopefully it is just one web application's web.config.

Because this can corrupt the web.config file of one or more web applications, it is important:

  • to check that the Microsoft SharePoint Foundation Administrative Service is configured to run with a domain account,
  • to know where solutions are deployed,
  • and to use correct parameters when deploying using Powershell.
  • Schedule Job's to run in the future

If the error in the web.config persists, simplest way to correct this issue is to rejoin the server to the farm.  Rejoining the server to the farm will give it a new web config. 

IMPORTANT NOTE:  this advice pertains to a farm with more than one web front end, where the corruption is present in a web front end that is not hosting central administration.  Do not use this advice, without moving central admin to another server.

Once central admin is on a server that does not have a corrupted web.config, rtake the server with the corruption out of the farm and rejoin the farm.

1. Open the SharePoint 2010 Products Configuration Wizard and take the server out of the farm
2. Open the SharePoint 2010 Products Configuration Wizard and join the server into the farm


Long story short:
 
The result of not properly removing features either via powershell or the gui is some form of corruption of the web application.  The same is true with deploying using incorrect parameters and forcing things - - >The web config may become corrupted as a result. 
 
Make sure the server is not running central admin, if it is, switch central admin to a different farm server, if a single farm, use powershell to remove solution after, using powershell to remove features. Then in either case, remove and rejoin farm.
 
 
Cheers!!

Sunday, September 8, 2013

Backup and Restore vs Export and Import

Here are a couple ways to copy content around in SharePoint:

Backup-SPSite and Restore-SPSite
 
and
 
Export-SPWeb and Import-SPWeb


A couple things to keep in mind:
 
Backup Restore SPSite is best used on Top sites, so use Backup and Restore SPSite if you are copying an entire site collection and all of it's sub sites to a new site collection on say a UAT or Production server. 
 
Use Export\Import SPWeb if you are copying a sub site and it's sub sites to a new location in a different site collection or if you are exporting a particular list or library to later import to a new site.
 
Make sure when exporting and importing that the site templates of the two sites, match.  In otherwords, if you are exporting from a team site ( webtemplate = STS#0 ) then make sure the target site that you're importing into is also based on the team site template. This post has good information on exporting and importing sites. http://anothersharepointblog.blogspot.com/2013/08/exporting-and-importing-cannot-import.html
 
Cheers,


Popular Posts