I hope you've enjoyed reading this blog over the last year and that you've had a great year in SharePoint.
There isn't going to be a blog post this week, due to the Christmas Holiday.
Next week I'll be back at it with instruction on putting a backup script in place.
Have a Merry Christmas and a Happy new year!
Cheers,
Stacy
P.S.
Check out this awesome PowerShell Reference Library on PowerShell.com: http://powershell.com/cs/media/28/default.aspx
Check out this PowerShell Code repository on http://poshcode.org/
Saturday, December 28, 2013
Saturday, December 21, 2013
Setting up your farm for optimal performance - Super User and Super Reader Accounts
It is important to configure the super user and super reader accounts for your SharePoint farm in order to optimize it's use of the object cache. This is true especially if you are using the SharePoint Server Publishing Infrastructure.
Here is a link to the detailed steps on TechNet: http://technet.microsoft.com/en-us/library/ff758656.aspx
Here are the high level steps:
Create or get two service accounts created, one for the Super User and one for the Super Reader
Add the Super User account to each web application with Full Control
Add the Super Reader account to each web application with Full Read
(Both of the above can be performed via central admin - Application Management > Manage Web Applications > User Policy)
Then run the following four lines in an elevated SharePoint management console
$wa = Get-SPWebApplication -Identity "<WebApplication>"
Repeat this for each web application that you have.
use these values:

Here is a link to the detailed steps on TechNet: http://technet.microsoft.com/en-us/library/ff758656.aspx
Here are the high level steps:
Create or get two service accounts created, one for the Super User and one for the Super Reader
Add the Super User account to each web application with Full Control
Add the Super Reader account to each web application with Full Read
(Both of the above can be performed via central admin - Application Management > Manage Web Applications > User Policy)
Then run the following four lines in an elevated SharePoint management console
$wa = Get-SPWebApplication -Identity "<WebApplication>"
$wa.Properties["portalsuperuseraccount"] = "<SuperUser>"
$wa.Properties["portalsuperreaderaccount"] = "<SuperReader>"
$wa.Update()
Repeat this for each web application that you have.
use these values:
- <WebApplication> is the name of the web application to which the accounts will be added.
- <SuperUser> is the account to use for the Portal Super User account as you saw it displayed in the User Column field mentioned in Step 14 of the previous procedure.
- <SuperReader> is account to use for the Portal Super Reader account as you saw it displayed in the User Column field mentioned in Step 14 of the previous procedure.
For example, assuming the sp content account shown below was the Super User account, you would type $wa.properties["portalsuperuseraccount"]="THEMANCAVE\SPContent"
on line two. On line one, you'd type either the URL or the name of the web application, so either $wa = Get-SPWebApplication -Identity "SharePoint - 80" or $wa = Get-SPWebApplication -Identity "http://2010app1/"
and on line three, it would be similar to line two, just replacing the account with the reader account, assuming spreader was the reader account,
$wa.properties["portalsuperreaderaccount"]="THEMANCAVE\SPreader"
Note: this server uses that as the search account, so you would want a different search account or a different reader account, don't use the same account for crawling and for reading the object cache.
Also, if you are working with a SharePoint 2013, you'll want to use the claims based accounts when running the powershell
$wa.properties["portalsuperreaderaccount"]="i.0#.w|THEMANCAVE\SPreader"
Also, if you are working with a SharePoint 2013, you'll want to use the claims based accounts when running the powershell
$wa.properties["portalsuperreaderaccount"]="i.0#.w|THEMANCAVE\SPreader"

Cheers,
Saturday, December 14, 2013
Web Application not getting created on all Web Front ends?
If you ever run into a situation where your farm suddenly fails to create the web application on all front end web servers, in other words it only gets created on the server running central admin, one good indication of that will be that the screen shown here:

Which normally advises you that the web application was created and would you like to know more about FBA (forms based authentication) will not appear.
Instead you will see a screen that says the page can not be displayed by Internet explorer, similar to the one shown here:


Which normally advises you that the web application was created and would you like to know more about FBA (forms based authentication) will not appear.
Instead you will see a screen that says the page can not be displayed by Internet explorer, similar to the one shown here:

This starts to occur when the process model shutdown time limit for the application pool that runs central admin is not long enough. This is usually due to one or a combination of the farm not having enough resources, being overworked due to more than 20 web applications, or numerous extended web applications.
The detailed steps for this blog post are found here: http://support.microsoft.com/kb/2543306
Here are the high level steps to resolve this issue:
Logon to your server that runs central admin
Open IIS Manager (inetmgr.exe)
Right click on the Central Administration application pool
Select Advanced Settings
increase the Shutdown Time Limit for the Process Model from the default of 90 seconds to something higher, e.g. 300 Seconds.

You're good to go now; but you should check and delete the web application that didn't replicate and make sure it was removed from the physical path of IIS before you attempt to recreate. Check all servers in your farm that have SharePoint binaries installed.
Before I knew this trick, I was adding and removing servers from the farm to get the web application to replicate, adjusting the process model shutdown time limit is much faster,
Cheers
Saturday, December 7, 2013
Exporting and Importing just a list or a library
If the goal is to import just one list or one library there are a couple ways you can accomplish this:
1. Navigate to settings for the list or library, save it as a template, navigate to the solutions gallery, right click on the newly created template, save it as Windows SharePoint Services solutions package and then deploy that solutions package to your site, activate the feature, and begin using the list or library, Or,
2. Run this PowerShell, making sure to use the actual URL of the list or the correct name of the library. Surround this item in quotes
Export-SPweb http://mySitethathaslist/sites/ToExport -Item "Lists\Name of the list" -Path e:\PathToSaveFile\Filename.cmp -IncludeUserSecurity -IncludeVersions All
then copy that Filename.cmp to the destination server and run
Import-spweb http://anothersharepointblog.blogspot.com -Path e:\PathtoWheretheFilewasImported\FileName.cmp -includeUserSecurity -UpdateVersions Overwrite
Note: if the url to the list was actually lists/nameList then the Item part in the Export-spWeb above would've read "Lists\nameList" and not "Lists\Name of Lists". Also if you are performing this for a document library, Lists\ is not needed.
Cheers,
Saturday, November 30, 2013
Provisioning a SharePoint 2010 Farm Service Applications using a PowerShell Script
This video is best if watched in Full Screen mode: http://www.youtube.com/watch?v=3HAjO8yiANM and any references to completed services should really say, the powershell script has completed creating the service application and you still need to manually configure it, just as you would if the service were created by the White Wizard. Difference with this method is that it generates a SharePoint environment containing database names that are GUID free.
Here's another video of this process
Contents of Bus.ps1 Replaces the White Wizard\Farm Wizard
It places all the service applications under one application pool in IIS
#####################################################
This script replicates most of the functionality found in the SharePoint Products Configuration Wizard with the EXCEPTION of the USER PROFILE SERVICE#####################################################
Add-PSSnapin Microsoft.SharePoint.PowerShell -erroraction SilentlyContinue
## Settings you may want to change ##
$databaseServerName = “2010SQL”
$searchServerName = “2010WEB1” #Front end Server that will run central admin, the server you’re on right now
$saAppPoolName = “SharePoint Web Services Default”
$appPoolUserName = “DOMAIN\MyFarmer” #farm admin account for Timer and Central admin, check that both services are running under this account before
# running this script
## Service Application Service Names ##
$accesssSAName = “Access Services”
$bcsSAName = “Business Data Connectivity Service”
$excelSAName = “Excel Services Application”
$metadataSAName = “Managed Metadata Web Service”
$performancePointSAName = “PerformancePoint Service”
$searchSAName = “SharePoint Server Search”
$stateSAName = “State Service”
$secureStoreSAName = “Secure Store Service”
$usageSAName = “Usage and Health Data Collection Service”
$userProfileSAName = “User Profile Synchronization Service”
$visioSAName = “Visio Graphics Service”
$WebAnalyticsSAName = “Web Analytics Service”
$WordAutomationSAName = “Word Automation Services”
$saAppPool = Get-SPServiceApplicationPool -Identity $saAppPoolName -EA 0
if($saAppPool -eq $null)
{
Write-Host “Creating Service Application Pool…”
$appPoolAccount = Get-SPManagedAccount -Identity $appPoolUserName -EA 0
if($appPoolAccount -eq $null)
{
Write-Host “Please supply the password for the Service Account…”
$appPoolCred = Get-Credential $appPoolUserName
$appPoolAccount = New-SPManagedAccount -Credential $appPoolCred -EA 0
}
$appPoolAccount = Get-SPManagedAccount -Identity $appPoolUserName -EA 0
if($appPoolAccount -eq $null)
{
Write-Host “Cannot create or find the managed account $appPoolUserName, please ensure the account exists.”
Exit -1
}
New-SPServiceApplicationPool -Name $saAppPoolName -Account $appPoolAccount -EA 0 > $null
}
Write-Host “Creating Usage Service and Proxy…”
$serviceInstance = Get-SPUsageService
New-SPUsageApplication -Name $usageSAName -DatabaseServer $databaseServerName -DatabaseName “UsageDB” -UsageService $serviceInstance > $null
Write-Host “Creating Access Services and Proxy…”
New-SPAccessServiceApplication -Name $accesssSAName -ApplicationPool $saAppPoolName > $null
Get-SPServiceInstance | where-object {$_.TypeName -eq “Access Database Service”} | Start-SPServiceInstance > $null
Write-Host “Creating BCS Service and Proxy…”
New-SPBusinessDataCatalogServiceApplication -Name $bcsSAName -ApplicationPool $saAppPoolName -DatabaseServer $databaseServerName -DatabaseName “BusinessDataCatalogDB” > $null
Get-SPServiceInstance | where-object {$_.TypeName -eq “Business Data Connectivity Service”} | Start-SPServiceInstance > $null
Write-Host “Creating Excel Service…”
New-SPExcelServiceApplication -name $excelSAName –ApplicationPool $saAppPoolName > $null
Set-SPExcelFileLocation -Identity “http://” -ExcelServiceApplication $excelSAName -ExternalDataAllowed 2 -WorkbookSizeMax 10 -WarnOnDataRefresh:$true
Get-SPServiceInstance | where-object {$_.TypeName -eq “Excel Calculation Services”} | Start-SPServiceInstance > $null
Write-Host “Creating Metadata Service and Proxy…”
New-SPMetadataServiceApplication -Name $metadataSAName -ApplicationPool $saAppPoolName -DatabaseServer $databaseServerName -DatabaseName “MetadataDB” > $null
New-SPMetadataServiceApplicationProxy -Name “$metadataSAName Proxy” -DefaultProxyGroup -ServiceApplication $metadataSAName > $null
Get-SPServiceInstance | where-object {$_.TypeName -eq “Managed Metadata Web Service”} | Start-SPServiceInstance > $null
Write-Host “Creating Performance Point Service and Proxy…”
New-SPPerformancePointServiceApplication -Name $performancePointSAName -ApplicationPool $saAppPoolName -DatabaseServer $databaseServerName -DatabaseName “PerformancePointDB” > $null
New-SPPerformancePointServiceApplicationProxy -Default -Name “$performancePointSAName Proxy” -ServiceApplication $performancePointSAName > $null
Get-SPServiceInstance | where-object {$_.TypeName -eq “PerformancePoint Service”} | Start-SPServiceInstance > $null
##START SEARCH
Write-Host “Creating Search Service and Proxy…”
Write-Host ” Starting Services…”
Start-SPEnterpriseSearchServiceInstance $searchServerName
Start-SPEnterpriseSearchQueryAndSiteSettingsServiceInstance $searchServerName
Write-Host ” Creating Search Application…”
$searchApp = New-SPEnterpriseSearchServiceApplication -Name $searchSAName -ApplicationPool $saAppPoolName -DatabaseServer $databaseServerName -DatabaseName “SearchDB”
$searchInstance = Get-SPEnterpriseSearchServiceInstance $searchServerName
Write-Host ” Creating Administration Component…”
$searchApp | Get-SPEnterpriseSearchAdministrationComponent | Set-SPEnterpriseSearchAdministrationComponent -SearchServiceInstance $searchInstance
##Crawl
Write-Host ” Creating Crawl Component…”
$InitialCrawlTopology = $searchApp | Get-SPEnterpriseSearchCrawlTopology -Active
$CrawlTopology = $searchApp | New-SPEnterpriseSearchCrawlTopology
$CrawlDatabase = ([array]($searchApp | Get-SPEnterpriseSearchCrawlDatabase))[0]
$CrawlComponent = New-SPEnterpriseSearchCrawlComponent -CrawlTopology $CrawlTopology -CrawlDatabase $CrawlDatabase -SearchServiceInstance $searchInstance
$CrawlTopology | Set-SPEnterpriseSearchCrawlTopology -Active
Write-Host -ForegroundColor white ” Waiting for the old crawl topology to become inactive” -NoNewline
do {write-host -NoNewline .;Start-Sleep 6;} while ($InitialCrawlTopology.State -ne “Inactive”)
$InitialCrawlTopology | Remove-SPEnterpriseSearchCrawlTopology -Confirm:$false
Write-Host
##Query
Write-Host ” Creating Query Component…”
$InitialQueryTopology = $searchApp | Get-SPEnterpriseSearchQueryTopology -Active
$QueryTopology = $searchApp | New-SPEnterpriseSearchQueryTopology -Partitions 1
$IndexPartition= (Get-SPEnterpriseSearchIndexPartition -QueryTopology $QueryTopology)
$QueryComponent = New-SPEnterpriseSearchQuerycomponent -QueryTopology $QueryTopology -IndexPartition $IndexPartition -SearchServiceInstance $searchInstance
$PropertyDatabase = ([array]($searchApp | Get-SPEnterpriseSearchPropertyDatabase))[0]
$IndexPartition | Set-SPEnterpriseSearchIndexPartition -PropertyDatabase $PropertyDatabase
$QueryTopology | Set-SPEnterpriseSearchQueryTopology -Active
Write-Host ” Creating Proxy…”
$searchAppProxy = New-SPEnterpriseSearchServiceApplicationProxy -Name “$searchSAName Proxy” -SearchApplication $searchSAName > $null
#####END SEARCH
Write-Host “Creating State Service and Proxy…”
New-SPStateServiceDatabase -Name “StateServiceDB” -DatabaseServer $databaseServerName | New-SPStateServiceApplication -Name $stateSAName | New-SPStateServiceApplicationProxy -Name “$stateSAName Proxy” -DefaultProxyGroup > $null
Write-Host “Creating Secure Store Service and Proxy…”
New-SPSecureStoreServiceapplication -Name $secureStoreSAName -Sharing:$false -DatabaseServer $databaseServerName -DatabaseName “SecureStoreServiceAppDB” -ApplicationPool $saAppPoolName -auditingEnabled:$true -auditlogmaxsize 30 | New-SPSecureStoreServiceApplicationProxy -name “$secureStoreSAName Proxy” -DefaultProxygroup > $null
Get-SPServiceInstance | where-object {$_.TypeName -eq “Secure Store Service”} | Start-SPServiceInstance > $null
#USER PROFILE SERVICE Creation commented out because there are still known issues
with creating it via powershell
#Write-Host “Creating User Profile Service and Proxy…”
#$userProfileService = New-SPProfileServiceApplication -Name $userProfileSAName -ApplicationPool $saAppPoolName -ProfileDBServer $databaseServerName -#ProfileDBName “ProfileDB” -SocialDBServer $databaseServerName -SocialDBName “SocialDB” -ProfileSyncDBServer $databaseServerName -ProfileSyncDBName “SyncDB”
#New-SPProfileServiceApplicationProxy -Name “$userProfileSAName Proxy” -ServiceApplication $userProfileService -DefaultProxyGroup > $null
#Get-SPServiceInstance | where-object {$_.TypeName -eq “User Profile Service”} | Start-SPServiceInstance > $null
Write-Host “Creating Visio Graphics Service and Proxy…”
New-SPVisioServiceApplication -Name $visioSAName -ApplicationPool $saAppPoolName > $null
New-SPVisioServiceApplicationProxy -Name “$visioSAName Proxy” -ServiceApplication $visioSAName > $null
Get-SPServiceInstance | where-object {$_.TypeName -eq “Visio Graphics Service”} | Start-SPServiceInstance > $null
Write-Host “Creating Web Analytics Service and Proxy…”
$stagerSubscription = “”
$reportingSubscription = “”
New-SPWebAnalyticsServiceApplication -Name $WebAnalyticsSAName -ApplicationPool $saAppPoolName -ReportingDataRetention 20 -SamplingRate 100 -ListOfReportingDatabases $reportingSubscription -ListOfStagingDatabases $stagerSubscription > $null
New-SPWebAnalyticsServiceApplicationProxy -Name “$WebAnalyticsSAName Proxy” -ServiceApplication $WebAnalyticsSAName > $null
Get-SPServiceInstance | where-object {$_.TypeName -eq “Web Analytics Web Service”} | Start-SPServiceInstance > $null
Get-SPServiceInstance | where-object {$_.TypeName -eq “Web Analytics Data Processing Service”} | Start-SPServiceInstance > $null
Write-Host “Creating Word Conversion Service and Proxy…”
New-SPWordConversionServiceApplication -Name $WordAutomationSAName -ApplicationPool $saAppPoolName -DatabaseServer $databaseServerName -DatabaseName “WordAutomationDB” -Default > $null
Get-SPServiceInstance | where-object {$_.TypeName -eq “Word Automation Services”} | Start-SPServiceInstance > $null
############################################## End Script
Now proceed to manually configuring your service applications (e.g. the Secure Store Service for Excel Services, Visio graphics, and performance point. The managed meta data service for a content type hub)
See this post starting at step 8 for steps to configure the User Profile Service
Saturday, November 23, 2013
Links to Software to create a home lab
Pre-requisite: A server with at least 16 GB of RAM
http://technet.microsoft.com/en-us/evalcenter/hh670538
- Server 2012
http://technet.microsoft.com/en-US/evalcenter/hh973397
- SharePoint Server 2013
http://technet.microsoft.com/en-US/evalcenter/dn407368
- previous editions (e.g. windows server 2008 R2, Sharepoint 2010, etc)
http://www.visualstudio.com/downloads/download-visual-studio-vs
90 day trials of Visual Studio
Here are your high level steps:
On your server with 16-32 GB of ram and xeon processors, run
up either Vmware, or install Windows Server 2012 Datacenter and install the
Hyper-V role
Then create a VM and
Install DNS or just wait for active directory to install it on your first DC
Install Active Directory Domain Services,
Install DNS or just wait for active directory to install it on your first DC
Install Active Directory Domain Services,
Create another domain controller and join it into the domain for redundancy
Create some Host (A) records in DNS
Create some Host (A) records in DNS
Start creating your vm’s for your farm
Install Windows
Install SQL
Install SharePoint
Install Windows
Install SQL
Install SharePoint
Saturday, November 16, 2013
What are Crawled Properties, iFilters, and Connectors in SharePoint 2010?
This post lists links to various TechNet resources, along with a brief regarding each resource:
Crawled Properties: this page details the properties that are included in the index by default. You can modify the default properties to provide a richer index that is targeted in relation to your objectives.
For example, is a person's work phone or job title part of the default content that is indexed from MySites? check this page to find out.
http://technet.microsoft.com/en-us/library/hh134087(v=office.14).aspx
to change that, click on Metadata Properties off the Search Service Administration page, available by navigating to Application management > Manage Service Applications
Default iFilters: this page details the file types that are supported by default. And, it lists whether the file types are included in the search administration file types page under the "file type included by default" column. If you don't see your file type listed, (e.g. adobe acrobat pdf), you have to download and install the iFilter, an image file for the crawl server to use next to pdf's, and then register the iFilter in registry.
http://technet.microsoft.com/en-us/library/gg405170(v=office.14).aspx
Default connectors: this page explains the various types of connectors that are supported out of the box. Ever wonder what sps3 was for? check out this page.
http://technet.microsoft.com/en-us/library/gg153530(v=office.14).aspx
Saturday, November 9, 2013
Move SharePoint Server IIS to a different drive
To move IIS to a different drive is a fairly straightforward procedure.
This blog - -> http://blogs.iis.net/thomad/archive/2008/02/10/moving-the-iis7-inetpub-directory-to-a-different-drive.aspx has detailed the steps very neatly.
In a nutshell, and to adapt them to a SharePoint install, here is what I recommend.
1. Run the SharePoint pre-requisite installer and say no to running the SharePoint products and Technologies Wizard.
2. Run the MoveIIS7root.bat from the site above
3. Use xcopy to copy all content to the new location
4. Verify that E:\inetpub was created, and verify ACL's and content with what is on C:\InetPub
5. navigate to HKLM\Software\Microsoft\InetSTP and make sure physical path to IIS is set to the path you selected when running MoveIIS7root.bat and verify that it does not contain two \\'s. it should read e:\ not e:\\
6. Verify that you can delete the C:\InetPub folder, and if you can not, then take ownership starting at the deepest directories and work your way up to the C:\inetpub, deleting as you go.
7. Stop and start www service (sc stop w3svc, sc query w3svc, then after is stopped, sc start w3svc - or via services.msc)
8. Stop and start IIS admin service (sc stop iisadmin, sc query iisadmin, sc start iisadmin)
9. Restart server, make sure recovery settings for services are set to restart on failures
.
10. Continue with the SharePoint install by running the SharePoint Product and Technologies Wizard
Saturday, November 2, 2013
How to - IIS moving sites and applications
In this completely, hypothetical, situation, you are the web administrator for a website named ChiNet. Chinet is an old, antiquated site, but you love it nonetheless and want to move it to a completely different server. The URL to Chinet is http://chinet.yourdomain.com
1. Open inetmgr (iis manager)
2. Then right click on the web you want to move to another server, or right click on the entire server if you want
3. Click on deploy and if you dont see deploy, click here
4. Click on export application
5. Copy the zip file to your destination server
6. Make sure the physical path to your web exists, and any local users and groups exist, on the destination server (e.g. d:\inetpub\chihome\wwwroot or whatever, and then the local users) - - this would be the relative same physical path where the site was stored, only now it is on the new server.
7. Open iis manager (inetmgr)
8. Create a new site that points to the physical path that you created in step 6
9. Right click on the site, click deploy, click import application
10. Navigate to the location where you placed the zip file
11. Place the contents of it in the root (watch this, it will try to double root you, maybe chihome/chihome, remove the second chihome)
12. Next through
13. Begin enjoying your website named chinet on the new server
14. Get the cname record in dns switched to point to this servers host name (A record)
Saturday, October 26, 2013
A few Random development tricks - slighted trickery
CSS to block quicklaunch etc.
<style>
.ms-quicklaunch
{
display:none;
}
.ms-navframe
{
display: none;
}
.ms-globalTitleArea {
display: none;
}
</style>
The following code is for a sharepoint redirect, just add it to a content editor web part
<meta http-equiv="refresh" content="10;url=http://MYSERVERNAME.com/Pages/default.aspx">
This code, below, taken from http://pathtosharepoint.com will ADD the quicklaunch using a CEWP
<!-- Load and display Quick Launch - iframe version -->
<!-- Questions and comments: Christophe@PathToSharePoint.com -->
<!-- Paste the URL of the source page below: -->
< iframe id="SourcePage" style="display:none;" src="http://[YourSite]/default.aspx" onload="DisplayQuickLaunch()"></iframe>
<script type="text/javascript">
function DisplayQuickLaunch()
{
var placeholder = document.getElementById("LeftNavigationAreaCell");
var quicklaunchmenu = null;
var SourcePage = document.getElementById("SourcePage");
try {
if(SourcePage.contentDocument)
// Firefox, Opera
{quicklaunchmenu = SourcePage.contentDocument.getElementById("LeftNavigationAreaCell") ;}
else if(SourcePage.contentWindow)
// Internet Explorer
{quicklaunchmenu = SourcePage.contentWindow.document.getElementById("LeftNavigationAreaCell") ;}
else if(SourcePage.document)
// Others?
{quicklaunchmenu = SourcePage.document.getElementById("LeftNavigationAreaCell") ;}
}
catch(err) { alert ("Loading failed");}
var allDescendants = quicklaunchmenu.getElementsByTagName("*");
for (i=0;i<allDescendants.length;i++) {
allDescendants[i].removeAttribute("id");
allDescendants[i].removeAttribute("onclick");
allDescendants[i].removeAttribute("onfocus");
allDescendants[i].removeAttribute("onmouseover");
}
placeholder.innerHTML = quicklaunchmenu.innerHTML;
}
</script>
Friday, October 18, 2013
Migrating to Windows 2008 R2 from a 32-bit (x86) Server
Overview
Since Windows 2008 R2 only comes in a 64-bit flavor it is
impossible to perform an in place upgrade on a Server running on x86 architecture for P2V or for whatever reason. As such, a migration to a new 64Bit server is
required. These are the two possible options:
- Deploy a new machine and
manually copy, recreate share permissions, Local users, groups etc.
- Use Windows Server
Migration tools to copy and create local users and groups, copy data, copy
share and folder permissions, etc.
This document covers the second bullet point.
Prepare the Target:
- Deploy the target machine from an approved template.
- After target is joined into the domain, install Windows Server Migration tools feature:
- Open Server manager click on features, then click on add features

- Scroll down and select the migration tools option, as shown:

- After selecting the Windows Server Migration tools, install it.
- Open a command prompt and navigate to c:\Windows\System32\ServerMigrationTools
- Share out a folder that the administrator account will be able to access across the network from the source machine, create this migration folder on the target server. In other words, Just create a folder named migration, share it so that you’ll be able to access it from the source.
- Create the migration package, go back to your command prompt and into the server migration tools directory under system32 and input the following command. Note: the shared folder used in this example is named Migration and is on the C:\
SmigDeploy.exe /package /architecture X86 /os WS03 /path
C:\Migration

(Image of actual command being run in a window on a machine that has the path to the
servermigrationtools folder defined in its environment variable)
Prepare the Source
- Install powershell v 1.0
or higher on the source, go to this site http://support.microsoft.com/kb/968929
scroll towards the bottom and download and install the appropriate version
of powershell for your servers architecture. (WARNING: don’t install x64 architecture
onto x86 machines or vice versa). A
restart is not needed to complete the install for version 2.0 powershell.
- Make sure .Net Framework
2.0 or higher is installed, if it isn’t go here and download the
appropriate installer for you architecture: http://www.microsoft.com/net/download
, A restart will be needed to complete the install.
- Navigate to the migration
shared folder that you created on the target
- Copy the entire folder
from within the migration folder to the C:\ drive of the source
machine. If you created a package
to migrate from a windows Server 2003 32 bit machine the folder you will
be copying in this step is named SMT_WS03_X86.
- Open a command prompt with
admin priviledges (e.g. right click cmd.exe and choose run as administrator)
- Navigate into the folder
that you just copied in step 2, (e.g. cd c:\smt_ws03_x86)
- Run the following command
to register the tools in the 2003 machines registry
.\smigdeploy.exe
- This will register the
migration tools and open a powershell command window allowing you to
proceed to the next section.
Migrate Local users
and groups
Migrate the local users and groups prior to migrating files,
folders, IIS webs, ntfs permissions, and share permissions.
Firewall
Pre-Requisites
To do this you’ll need to run the following commands on your
windows 2008 R2 target and might have to run one command on the 32 bit machine:
2008 or 2008 R2
netsh advfirewall firewall add rule
name=ServerMigration(TCP-In) dir=in
program=%windir%\System32\WindowsPowerShell\v1.0\powershell.exe action=allow
protocol=TCP localport=7000
netsh advfirewall firewall add rule
name=ServerMigration(UDP-In) dir=in
program=%windir%\System32\WindowsPowerShell\v1.0\powershell.exe action=allow
protocol=UDP localport=7000
The 2003 machine will more than likely not have the firewall
enabled and as a result will not need this command.
2003
netsh firewall add allowedprogram
program=%windir%\System32\WindowsPowerShell\v1.0\powershell.exe
name="ServerMigration" mode=ENABLE
- In the powershell window
that opened after you registered the migration package on the source
computer enter the following command:
Export-SmigServerSetting -User All
-Group -Path \\ServerName\Migration –Verbose
Notice: the –Path points to the
server name and the migration share; so, if you shared your migration folder
out as WindowsMigration, the path would be different.
- Go to the target server,
open a Windows PowerShell session with elevated user rights. To do this,
click Start,
click All
Programs, click Accessories,
open the Windows
PowerShell folder, right-click Windows PowerShell,
and then click Run
as administrator.
- Enter the following:
Add-PSSnapin
Microsoft.Windows.ServerManager.Migration
(Note: this loads the server
migration tools snap in into powershell)
Then enter,
Import-SmigServerSetting -User All
-Group -Path c:\Migration –Verbose
Notice: the –Path points to C:\
drive and the migration folder since it is on this server
- Wait for the task to
complete and then verify local users and groups from the source to the
target
- Once you have verified
that all users and groups were migrated, you’re ready to migrate files,
folders, shares, etcetera
Migrate Files and
folders
Source server – Step
One
- In the elevated powershell
window enter the following:
Send-SmigServerData -ComputerName <DestinationServer>
-SourcePath d:\users -DestinationPath d:\ users -Recurse -Include All -Force
Note: <DestinationServer> =
the netname of your destination server and there is a space in between/ in
front of -, but it is hard to see.
Hint: If you make the source path
the same as the destination path, the migration will create the folder on the
destination and copy all files into the destination folder while creating all
permissions, share permissions, and webs.
We found that running the send-smigserverdata prior to the receive works
better in SSANet.
If this fails, reverse steps one
and two.
Target Server – Step
Two
- In an elaveted powershell
window make sure you have the migration tools snap in loaded (see step 3
from the previous section). Note:
if you didn’t close the powershell window from the import you’re good to
go.
- Enter the following within
5 minutes of kicking off the send
Receive-SmigServerData
All progress will be shown on the
source server, don’t restart the server or close the powershell windows on
either source or target.
References:
http://technet.microsoft.com/en-us/library/dd379474(v=ws.10).aspx - Contains detailed instructions, including
what was described in this document.
Technet
Video on Migration tools install into a 32 bit or 64 bit server. - http://technet.microsoft.com/en-us/windowsserver/ee914657.aspxGood luck and Cheers, Stacy
Saturday, October 12, 2013
Convert a classic based authentication SharePoint 2010 web application into a claims based web application that will use forms based authentication
This blog post attempts to bridge the gap between creating a claims based authentication web application versus converting a classic web application to claims, essentially step 1 of this blog: http://blogs.technet.com/b/mahesm/archive/2010/04/07/configure-forms-based-authentication-fba-with-sharepoint-2010.aspx
New-SPAuthenticationProvider - http://technet.microsoft.com/en-us/library/ff607878.aspx
Here's how you create a new web application that uses claims based authentication, using powershell (step one of the first link in this blog). Notice how $ap variable, below, substantiates the new authentication provider and provides the membership provider and role provider names?
$ap = New-SPAuthenticationProvider -ASPNETMembershipProvider "membership" -ASPNETRoleProviderName "rolemanager"
Set-SPWebApplication -Name "Claims Windows Web App" -ApplicationPool "Claims App Pool" -ApplicationPoolAccount "redmond\appool" -Url http://<servername> -Port 80 -AuthenticationProvider $ap
Then notice how the set spweb application actually creates the new web app using that variable $ap
Finally, When you provision\create a web application in SharePoint 2010 you get the option to enable Claims based authentication. However, after the provisioning there's no option in the GUI to turn it on if you wanted to switch from classic to claims.. PowerShell to the rescue once, again with the option to change from classic to claims based authentication using the lines below.
$App = get-spwebapplication “http://sp1:8000”
$app.useclaimsauthentication = “True”
$app.Update()
then set the membership and role providers
see this blog for the rest of the steps, and remember that this is a one way street and you cant go back to classic
http://blogs.technet.com/b/mahesm/archive/2010/04/07/configure-forms-based-authentication-fba-with-sharepoint-2010.aspx
New-SPAuthenticationProvider - http://technet.microsoft.com/en-us/library/ff607878.aspx
Here's how you create a new web application that uses claims based authentication, using powershell (step one of the first link in this blog). Notice how $ap variable, below, substantiates the new authentication provider and provides the membership provider and role provider names?
$ap = New-SPAuthenticationProvider -ASPNETMembershipProvider "membership" -ASPNETRoleProviderName "rolemanager"
Set-SPWebApplication -Name "Claims Windows Web App" -ApplicationPool "Claims App Pool" -ApplicationPoolAccount "redmond\appool" -Url http://<servername> -Port 80 -AuthenticationProvider $ap
Then notice how the set spweb application actually creates the new web app using that variable $ap
The user running these commands should be a member of the SharePoint_Shell_Access role on the config DB, and a member of the WSS_ADMIN_WPG local group on all front end servers.
Finally, When you provision\create a web application in SharePoint 2010 you get the option to enable Claims based authentication. However, after the provisioning there's no option in the GUI to turn it on if you wanted to switch from classic to claims.. PowerShell to the rescue once, again with the option to change from classic to claims based authentication using the lines below.
$App = get-spwebapplication “http://sp1:8000”
$app.useclaimsauthentication = “True”
$app.Update()
then set the membership and role providers
see this blog for the rest of the steps, and remember that this is a one way street and you cant go back to classic
http://blogs.technet.com/b/mahesm/archive/2010/04/07/configure-forms-based-authentication-fba-with-sharepoint-2010.aspx
Saturday, October 5, 2013
An error has occurred after removal of an extended zone
Let's say you've applied the advice from unextending an extended zone and are now either getting a blank page after re-using the the vanity url or you're receiving a message that "Something has went wrong" or "An error has occurred".
You ran Get-SPWebApplication http://sitename.com | Remove-SPWebApplication http://sitename.com -Zone "Intranet" and then the Intranet choice was available on the web application, the alternate access mapping for http://sitename.com was no longer associated with said web application and the world seemed right.
It seemed right until that vanity url was re-extended the web application. It was at this point that an error occurred. Or if you re-extended the same vanity URL on a different web application you are now getting a blank page and no semblance of your SharePoint site.
Here's what to do: Navigate to the physical storage for each site on each server that is a member of your web garden \ SharePoint Farm, barring the SQL boxes, and make sure that the site was removed from IIS.
If you see the folder located there in the virtual directory, go back and first remove the site from IIS, as it is more than likely still there, then delete this folder.
In other words after unextending the site, navigate to inetpub\wwwroot\wss\virtualdirectories and make sure that the folder is gone, then look in IIS and make sure that the site is also not hanging around, if they are, delete them. Repeat on each server that is a member of your farm (web garden) and then reset IIS on all servers in the farm.
Sorry about not including that in the original post, good luck and cheers! Stacy
Sunday, September 29, 2013
Speed up that slow team site, make it publish and harness the output cache
The steps below turn your team site into a team site that is capable of using publishing features and capabilities. But all they really do, from an end user perspective, is optimize how the page loads.
These steps are needed to speed up load times for sites built off the Publishing Portal web template\BlankInternet#0 and/or the Team Site Template\STS#0 to get the desired snappiness affect.
In other words, these steps will have a positive impact on both publishing portals and/or team sites; since, neither site has the output cache enabled by default.
Pre-requisites: Site collection Administrator
1. Open the site and go to top level site settings, _layouts/settings.aspx

2. Then make sure you’re in the top site, aka the site collection’s first site or parent site and click on Site Collection Features under Site collection administration. If you see “go to top level site settings” click it and then click on Site collection features.
3. Make sure you didn’t click on Site features, check that the url is not ending in _layouts/ManageFeatures.aspx but rather _layouts/ManageFeatures.aspx?Scope=Site
4. Now Turn on (activate) SharePoint Server Publishing Infrastructure
5. Now remove the ?Scope=Site and turn on SharePoint Server Publishing
6. Now go back to the settings (_layouts/settings.aspx) page of the top level site
7. Click on Site collection cache profiles and examine the various profiles, especially the Intranet (Collaboration site)
8. Go back to settings, and click on Site collection object cache and examine the settings
9. Go back to settings, click on site collection output cache, enable the output cache by checking the box, choose the Intranet (Collaboration site) for anonymous cache profile and for authenticated cache profile, check the boxes under Page output cache policy and if you want debug info, check that one as well
10. Go back to settings, and under Site Administration, click site output cache, click apply these settings to all sub sites, and then click ok
11. Close your sites, clear your browser cache, flush your history of visitied sites from your machines DNS cache (ipconfig /flushdns)
12. Ok, now the site will be tested as to how fast it opens, open it
Sunday, September 22, 2013
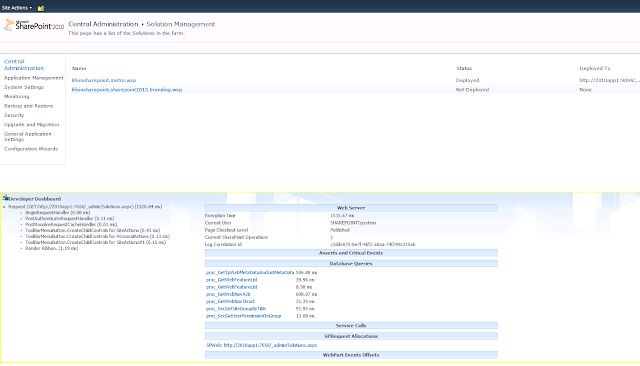
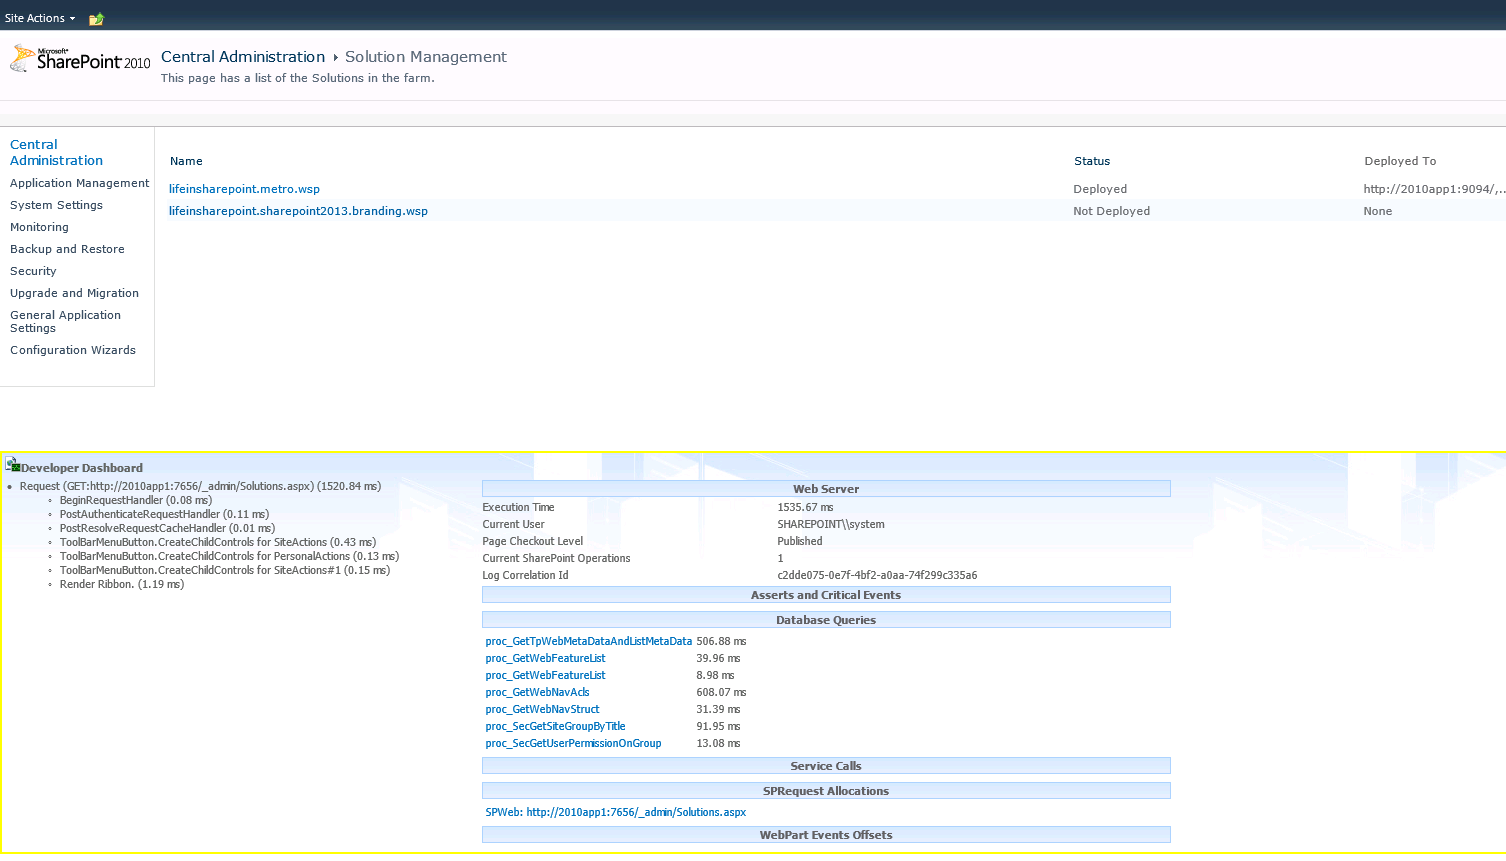
Enable and Use Developer Dashboard to see how your page loads and view metrics.
Pre-requisites:
Site-collection administrator
Follow these steps, or ask your admin, to enable the developer dashboard in on demand mode:
(green-can use your own values, red-controls outcome, black-don't change it)
1. Open the SharePoint Management Shell as an admin

After the dashboard is enabled, the metrics are shown at the bottom of the page that is loaded, refresh the page to see how fast it loads, HTTP Handler events for the HTTP request, Web Server Stats, Asserts and Critical Events, Database Queries, Service Calls, SPRequest Allocations, and WebPart Events Offsets.
To turn it off
Site-collection administrator
Follow these steps, or ask your admin, to enable the developer dashboard in on demand mode:
(green-can use your own values, red-controls outcome, black-don't change it)
1. Open the SharePoint Management Shell as an admin
2. Type the
following commands:
$service=[Microsoft.SharePoint.Administration.SPWebService]::ContentService
$devdashsetting=$service.DeveloperDashboardSettings
$devdashsetting.DisplayLevel=[Microsoft.SharePoint.Administration.SPDeveloperDashboardLevel]::OnDemand
$devdashsetting.Update()
This script
enables the Developer Dashboard in OnDemand mode.
You could also, as an alternative way of enabling this, add those commands to a text file, save the file as a .ps1 and then execute the ps1 on your farm.
You could also, as an alternative way of enabling this, add those commands to a text file, save the file as a .ps1 and then execute the ps1 on your farm.
After the dashboard is enabled, the metrics are shown at the bottom of the page that is loaded, refresh the page to see how fast it loads, HTTP Handler events for the HTTP request, Web Server Stats, Asserts and Critical Events, Database Queries, Service Calls, SPRequest Allocations, and WebPart Events Offsets.
To turn it off
$service=[Microsoft.SharePoint.Administration.SPWebService]::ContentService
$devdashsetting=$service.DeveloperDashboardSettings
$devdashsetting.DisplayLevel=[Microsoft.SharePoint.Administration.SPDeveloperDashboardLevel]::Off
$devdashsetting.Update()
Subscribe to:
Posts (Atom)
Popular Posts
-
 When you're migrating sites using export-spweb and import -spweb , you might receive an error message on the import, when reviewing th...
 -
Here are a couple ways to copy content around in SharePoint: Backup-SPSite and Restore-SPSite and Export-SPWeb and Import-SPW...
-
Let's say you go to provision a Project Web App via managed service applications, project server server application, and it fails. Ther...
-
Log onto each additional server that you wish to join into the farm Open the ”SharePoint 2010 Management Shell” administratively (righ...
-
Configuring User Profile Synchronization Service Applications for SharePoint 2010 or SharePoint 2013This post assumes you've already installed the SharePoint Binaries (Grey Wizard), and that you are not using the Farm Config Wizard (Wh...
-
 If you ever run into a situation where your farm suddenly fails to create the web application on all front end web servers, in other words i...
 -
Sorry to be blogurgitating this week. Here's a really good technet site with a load of virtual labs: SharePoint Server 2010 In...
-
Once a web application has been extended into a zone, the option to choose that zone disappears from the drop down, off the extend web appli...
-
 When the need to list out the members of an active directory group arises, say management asks, who are the members of this group, and you d...
 -
 The steps below turn your team site into a team site that is capable of using publishing features and capabilities. But all they really do,...